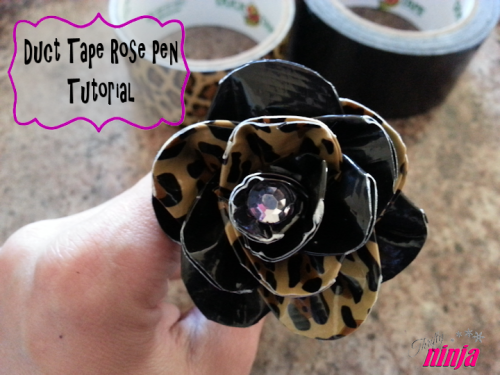
I was walking through Lowes yesterday and saw a big display of duct tape. It was all different colors and patterns and I was drawn to it. I had to have some. I had to create.something. I had nothing in mind, but knew I would spend the remainder of my day making duct tape items.
That’s exactly what I did.
I sat outside while the kids played with rolls of duct tape, scissors and various other craft supplies. After several major FAILS, I came up with this really awesome rose. While I love the duct tape roses that most create, I wanted something a little different.introducing the rounded edge rose. I know they aren’t brand new, but its something different for me and I thought Id share because I’m betting a lot of people hadn’t seen them before.
Supplies:
- Duct tape (you can use any many colors as youd like)
- Scissors
- Pen to cover (you could also use a wooden dowel if you didnt want to make pens)
- 1 Rhinestone the side of the end of your pencil/dowel
- Hot glue gun
Directions:
- Hot glue your rhinestone to the end of your pen/dowel. This will keep you from being able to see the pen/dowel on the finished product. It isn’t necessary but really helps with the overall look.
- Cut your duct tape in 2 inch pieces. You can cut as many as you’d like to create your rose as small or large as you’d like. I used 14 on the flower shown.
- Fold over one corner of your tape. You want to leave an L in the white, sticky part of the tape.
- Fold over the other corner. This makes a triangle with a sticky part at the bottom of the piece.
- Using your scissors, cut the point off your triangle. This will give you the fun, rounded look of this rose.
- Wrap your first piece tightly around the end of the pen/dowel.
- Continue wrapping pieces around to create your rose. I didn’t like the pieces being flat, so I made little folds in the tape as I went. I think this makes the rose look more realistic (if a duct tape rose can be realistic).
- Take a small (maybe 1/3-3/4 inch) strip of duct tape and wrap it around the base of your flower. This will help keep your little folds in place and helps with the overall look.
- Cut a piece of duct tape long enough to reach the base of your flower to the tip of your pen. I like to stop the tape just before the pen begins to change shape at the tip. Place your pen on one of the long ends of tape and carefully wrap the tape around the pen; try to keep it as smooth as possible.
- You’re done! Enjoy!
Put these in a vase with some colorful rocks/stones or anywhere you want to brighten up the area!
This post has been resurrected here. It was originally placed on the site thriftyninja . com. Glad we could bring it back. Thank you, Amber.
