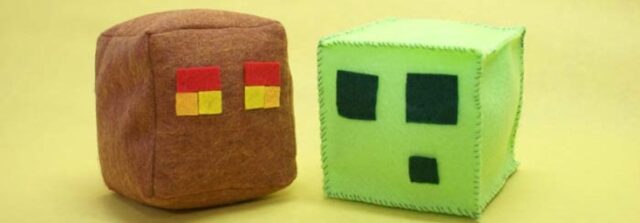
DIY Plush Minecraft Slime and Magma Cubes
Here’s a super simple idea for Minecraft fans–felt plushy toys! This is sooooo easy, your kid could even make it! All you need is felt, stuffing, scissors, thread and a needle. Boom! There are two Minecraft mobs perfect for this style of toy: slimes and magma cubes. Why? They’re cubes already!
Editor’s Note: We mentioned this DIY tutoriial on our page here, but the link to the original post found here beerandgluesticks.com/diy-plush-minecraft-slime-magma-cubes/ has since been deleted. We tracked the owner’s new site and found a post about the missing post here: http://stlmotherhood.com/diy-plush-minecraft-slime-and-magma-cubes/ but still now actual information. So we have recreated it for our viewers. If Denise would like us to remove this, we will, but we thought it would be nice to keep this information avaialable. Here blog is here: http://stlmotherhood.com/
The inspiration for the Minecraft plushy came from Choly Knight’s book: Craft Projects for Minecraft and Pixel Art Fans. Which I’m in! Ok, it’s a little mention, but Choly asked to use my Minecraft Christmas Ornaments (from my other blog, stlMotherhood) in a gallery of fan art in the book. We got a couple free copies for sharing, and now Mitch is demanding that we make EVERYTHING. So we started with the plushies.
Choly’s plush cubes are hand sewn using a whip stitch. This is not a sewing blog, so if you need to know how to whip stitch try looking at the directions here. (Or go get Choly’s book, she explains everything very well.) She also leaves the seams on the outside of the cube, like in the slime we made.
However, I don’t like to hand sew when I can break out the sewing machine, so I made the magma cube with a machine and turned it inside out so the seams are hidden. Mitch didn’t think that was right–the kid is a purist–but it was faster for me. The magma cube also turned out a bit rounder, but it might be because he has more stuffing.
Make Your Own
First, cut your squares–you’ll need six for a cube. A standard sheet of felt from the craft store will give you six four-inch squares and a little extra scrap. You’ll also need small squares for the face: darker green for a slime; red, yellow and orange for a magma cube.
Second, place the face. We used fabric glue on the magma cube…and that took way too long to dry for Mitch. You’ll need to let it set overnight for a decent bond. Needless to say, I had to keep regluing the magma cube because Mitch kept trying to play with him. The slime was hand stitched. You can get an idea what the faces should look like by doing a Google image search, or checking out Pixel Paper Craft.
 Now sew! The easiest way to keep everything straight is to start with your bottom square and add the sides TO THE BOTTOM FIRST. Then stitch up the sides and finish with the top square of felt.
Leave one seam open for adding the stuffing. The magma cube got quite a lot of stuffing, but the slime was kept a bit less full to keep his sides flat.
Stitch up the last seam and ta da! A Minecraft plushy!
