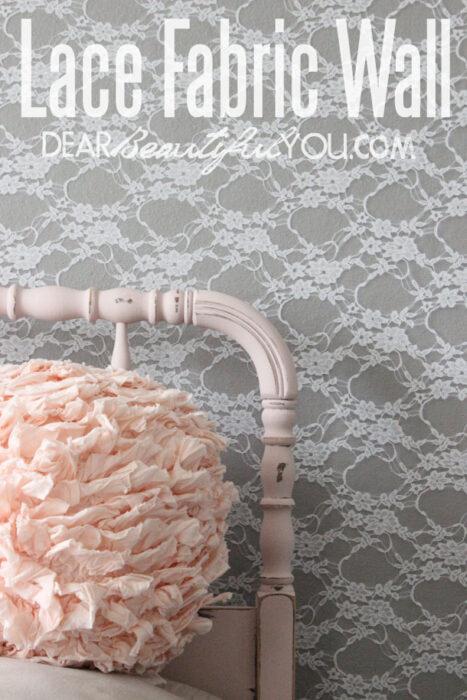
Hey everyone! I’m extremely excited today to share a sneak peak into Ella’s bedroom. I spent lots of time pinning little girls bedroom inspiration, and after some time of looking at wallpapers and stencils, I finally decided I wanted something quick, easy, cheap and beautiful. That’s when I decided to try putting lace on the wall like wallpaper. Yes, you heard it right, I put real lace fabric on the wall. I realize this is probably impractical, but it is so BEAUTIFUL!! I don’t regret it one bit. I am in LOVE with it!
Editor’s note: I found this wonderful tutorial in Feb. 2017. I was notified today that this site is no longer active and has been taken down. But rather than leave you with a broken link from my page about Creative Painting Ideas, I have found this tutorial for a fabric wall and copied to BigDIYIdeas.com. The original poster was Christina who posted it on January 17, 2014 on her now defunct site, DearBeautifulYou.com. If the owner would like this removed, please contact me and I will do so. Enjoy this wonderful DIY post and thank you to DearBeautifulYou.com for creating it.
- 2 paint colors for your wall ( I used gray and white)
- Painters Tape
- Painting supplies
- Link to the lace I used- Off White Giselle Stretch Floral Lace Fabric
- Flat thumb tacks
- Wall trim/molding, enough to go around the entire room
- Table Saw
- Level
- Nail Gun
- Professional Carpenter
Step 1: The lace I purchased is stretchy and 70″ wide which I found made this project a whole lot easier. You need to measure up your wall the width of the fabric around the entire room. In this case I put my line 70″ from the top of the base trim. You really want to hang some of the lace first and test it out before you finalize and start painting. You want the lace to stretch a little bit so that it is not wrinkled or droopy. Once you have taped your line around the room, you can start painting. I chose to do a gray on the lower half and white on the upper half. You will be putting trim up over the center line, so it does not need to be perfect.
Step 2: Now, you will be applying the lace to the wall. Start in a corner and tack it all the way across the wall with flat thumb tacks.
Step 3: Tack the bottom of the lace right above the base board.
Step 4: Next, tack all the way down both corners, with the tacks pinned into the wall that will have the lace. You will need to keep readjusting your pins and stretching the lace while trying not to distort it. Continue re-pinning until the lace is laying flat against the wall. You should have some lace hanging in the corners now. Once secure you can cut off the excess hanging lace. This does not have to be perfect because trim will be going over the top of it. Now you are ready to add the trim. For this particular project, I used the white trim shown below.

Step 5: Paint your trim before hanging it on the wall if you want it painted. I painted mine with Annie Sloane Antoinette Chalk Paint. We will talk more about my chalk paint obsession at a later date. After it dried, I did some sanding on the edges to give it a distressed look and so the white showed through.
Step 6: Now that your trim pieces are ready, you can hang it up around the room to separate the two colors from each other and to frame in the lace. For this project I called my dad to come help out since he builds beautiful homes every day. Perfect guy for the job. I am not an expert when it comes to woodwork…yet. Just starting to dip my hands into that area, but some tips I have for you on this particular project are to choose trim pieces that have a concave space on the backside. The tacks will fit perfectly in the space which in turn keeps the trim flush against the wall. The other tip is to either mark or try to remember where the tacks are located so that you don’t hit them to many times with a nail gun. If you know someone who has a table saw, nail gun and level, I would suggest making a batch of cookies & inviting them over… I will share some step by step wood projects soon, but for now I’m gonna leave it to the professionals.
This project has been so much fun for me. When I was a little girl, my mom always make our room so beautiful. Most of the inspiration I’m getting for Ella’s room is from my dream room growing up. I can’t wait to share her room reveal with you! ♥Christina
Below is a great pinnable image of this tutorial…


