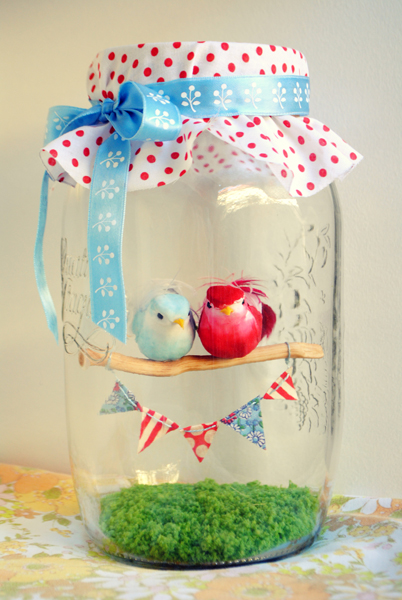
It’s almost Valentines Day! That means it’s time for candy hearts, holding hands, secret love letters and lovely dovey craft projects. Yes! To celebrate the snuggliest of all holidays, I made a little love birds diorama. This project would make a cute gift for a beloved, a sweet holiday decoration sitting on a pretty shelf, or a nice centre piece for a Valentines feast.


To make your own love birds diorama you’ll need…
Materials
- Wide Mouth Glass Mason Jar
(The mouth of the jar needs to be large enough for you to easily fit your hand in.)
- 2 Feathered Birds (Vintage birds are available from Etsy and new birds are available from craft stores.)
- Stick
- Fabric Scraps (I chose red and blue scraps to match the colors of my birds. You’ll need a few tiny pieces for the miniature garland and one bigger piece to cover your jar lid.)
- Embroidery Thread
- Iron-on Adhesive
- Faux Grass (This is used in scale modelling and is available from hobby shops.)
- Rubber Band
- Ribbon
Tools
- Scissors
- Needle
- Hot Glue Gun
- Fine Sandpaper
- Small Plate
- Pencil
Instructions
1. Find a nice stick and snap it so that it’s the right size to comfortably sit across the width of your jar. Give it a gentle rub with the sand paper to clean it up and smooth any rough edges.
2. Use your glue gun to stick your birds into position on the stick.
3. Follow the directions of your iron-on adhesive to fuse your tiny fabric scraps so that they are back to back. This will prevent your miniature garland from fraying and make the garland double sided, so your diorama will look cute from every angle.
4. Cut small triangles out of the fused fabrics.
5. Use your needle and embroidery thread to thread the triangles together. Just sew one long stitch along the top edge of each triangle.
6. Tie the ends of your miniature garland to the ends of the bird perch and trim away any excess thread.
7. Put a blob of glue on one end of the bird perch and as quickly as you can, stick it to the inside of your jar. You might like to practice the motion of maneuvering your perch in and out of the jar without glue first, as this can be a little awkward. It also helps to make a mark on the jar where you intend to glue the perch, so you know where you are aiming.
8. Pour some faux grass onto the floor of your jar and screw the lid on.
9. Use your small plate and pencil to trace a circle on your larger piece of fabric and cut the fabric circle out.
10. Secure the fabric circle over the jar lid using the rubber band, then cover the rubber band with ribbon and tie ribbon in a pretty bow.
Wishing you all lots of Valentines treats and a little time with those you love most!
Editor’s Note: This post was originally on houseofhumble.com which is, unfortunately, no longer on the Internet. We have posted it here to give fans an opportunity to view this tutorial. We had linked to the original post from a list of snow globe DIY ideas. If the original author would like this removed, please email us.
